The Hubsan 4x is an extremely fun microquadcopter to fly. Sometimes, maybe after a crash, a motor stops working and replacement is required.
Unfortunately motors wires are soldered directly on the controller board. No connectors. The spare motors that can be bought online indeed come with 2 “naked” wires.
I had to replace a motor on an Hubsan 4x for a fiend today. What I did was to open the Hubsan 4x, it is hold together by 3 tiny screws and 4 little plastic pins located halfway on each of the arms. So once the screws are removed, you still have to play a bit, gently, to take apart the two halves.
Once the quadcopter is open, first step is to cut the wires of the faulty motor, approximately 1cm from the the body of the motor, so as to leave a generous length of the wires soldered to the board.
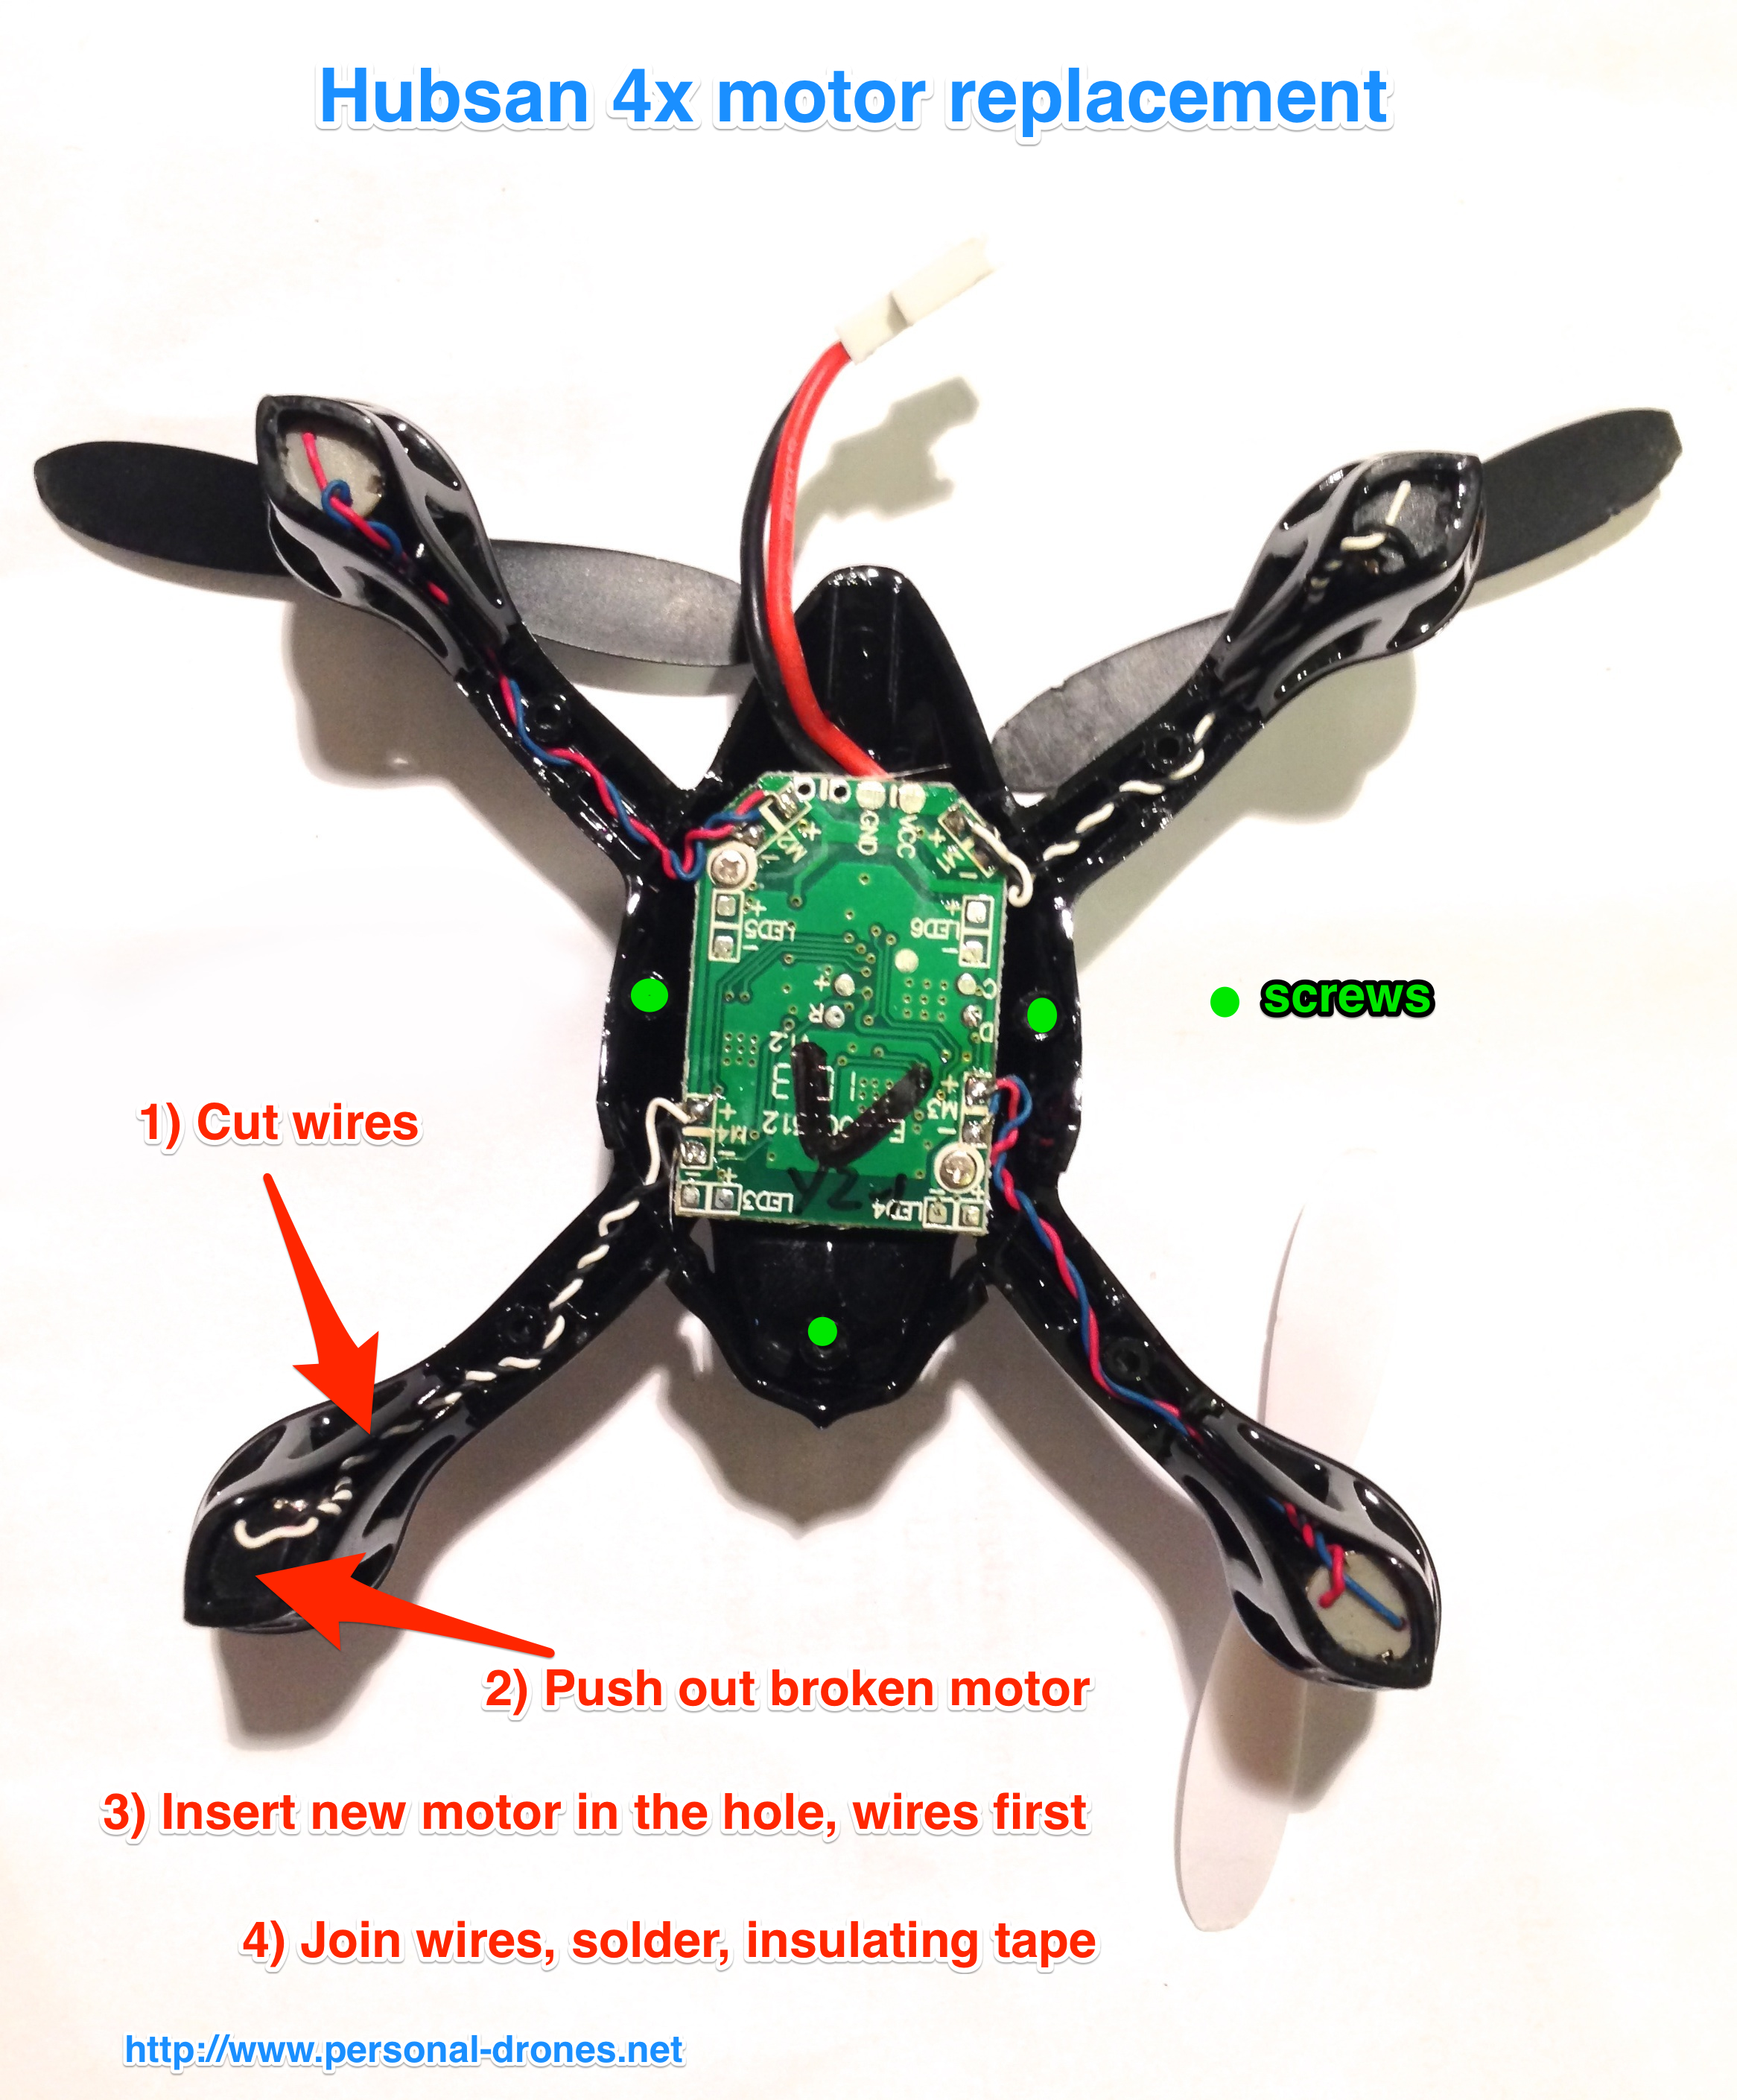
The motor can be extracted by pushing it from below with a screwdriver or a pen. The new motor can be now inserted, but first the wires of the new motor have to go through the motor hole.
Then, you uncover the final 0,5cm of each of the 4 wires, the two of the original motor, soldered to the board, and the two from the new motor and join them together as in the picture below:
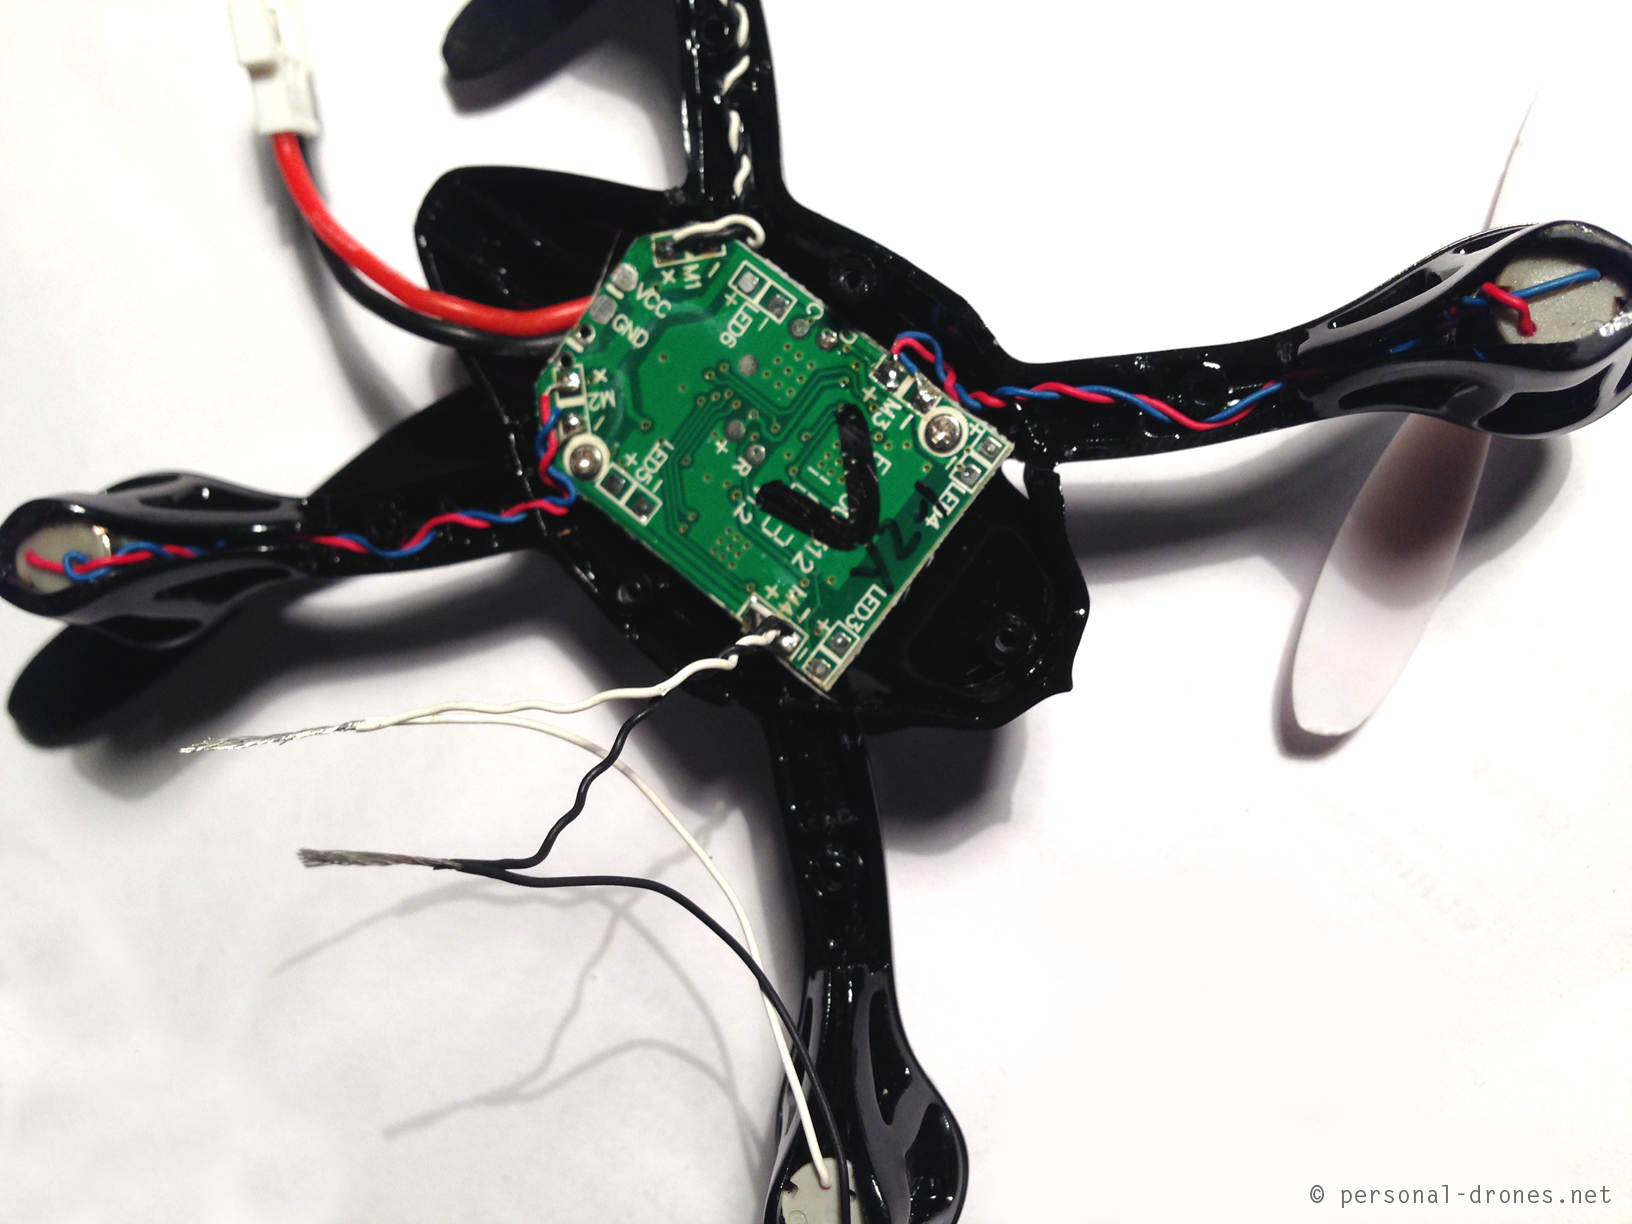
Then the two junctions can be soldered easily. Some insulating tape on each of the junctions will finish the job. Here’s an excellent video about the basics of soldering, highly recommended:
http://www.youtube.com/watch?v=BxeDkcAa4Fs
####
This post is sponsored by Apps4Rent
Monitor, edit configure files and go mobile like the quadcopters by carrying your virtual PC on the cloud and access it via your mobile device using CloudDesktopOnline.com, Powered by one of the best Daas provider – Apps4Rent.
####
Stay tuned on the Personal Drones Blog for the latest quadcopter and multirotor news!
I wish I had seen this before I tried soldering the wires back on my X4 board as I ended up frying it! Guys I have spoken to recommend you solder directly to the board rather than join wires together, that’s all very well but for someone with little soldering skills you may be better off with this method.
Droneguy, not sure what your soldering skills are, but when I saw how tiny and close together the soldering spots for the motor wires are, I had no doubt that I had to cut the wires of the old motor, and solder to this rather than to the board directly 🙂
Hers the thing,,,,,,eventually, you will find yourself needing a new board and you will have no choice but to learn to solder to the those small spots.
watch a soldering video on Utube,,,,,,it’s not that hard.
For a very first soldering project, I’m liking the idea of joining wires rather than wires to board. If I crash it enough more times and run out of wire (or kill the board), I can cross that bridge when I get to it (and have a bit more soldering experience under my belt).
Thanks for the tips!
I soldered directly to the board but the split wire method is good too and dont worry about running out of wire, cut on the end closest to the motor, I mean right at the motor you want to remove. Don’t need to have wire hanging off of a dead motor so you will always have enough and then if you didn’t even want to solder it you can go with micro ‘push in’ clips that you just crimp onto the end of the wires, cover in electrical tape/shrink tubing and off ya go.
For everyone with a spare motors, a clockwise or counter clockwise. You can use the motor in place of any of the motors. You just need to switch the negative and positive to make the motor spin the other way. The colors are just their to help you know which is which.
For example. I used the red/blue motor in place of the white/black. I jus soldered the red to black and the blue to white. Use the correct blade and it fly’s like a champ. Enjoy.
HI
I tried the “Solder to the board” method.
It seemed to go well until i connected the battery (controller is still off).
the resoldered motor just spins really low on its own, the other 3 are still.
the other 3 all power up when the controller is turned on and power given.
Not sure why the motor is spinning by its lonesome.