I’d like to report on my latest build in the quest for the perfect mini personal drone. Like the mini H quad and the mini quad for FPV builds, this is again a small quadcopter, that should be possibly slightly smaller than the last one.
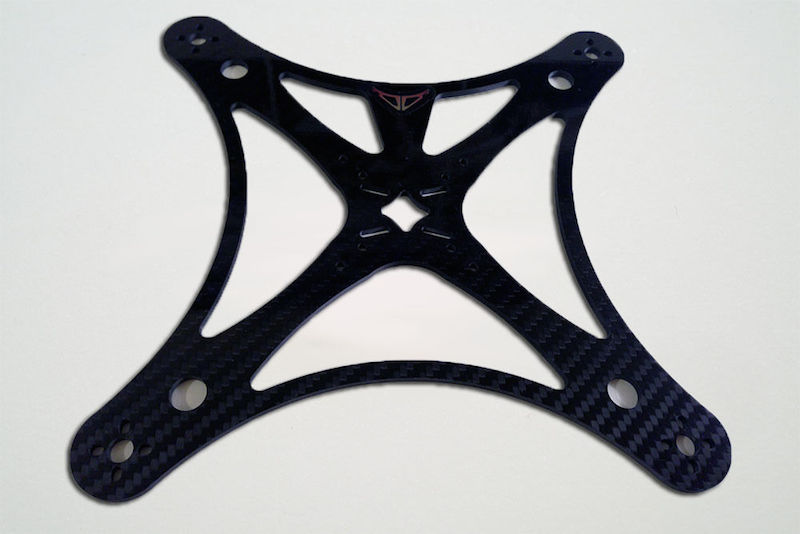
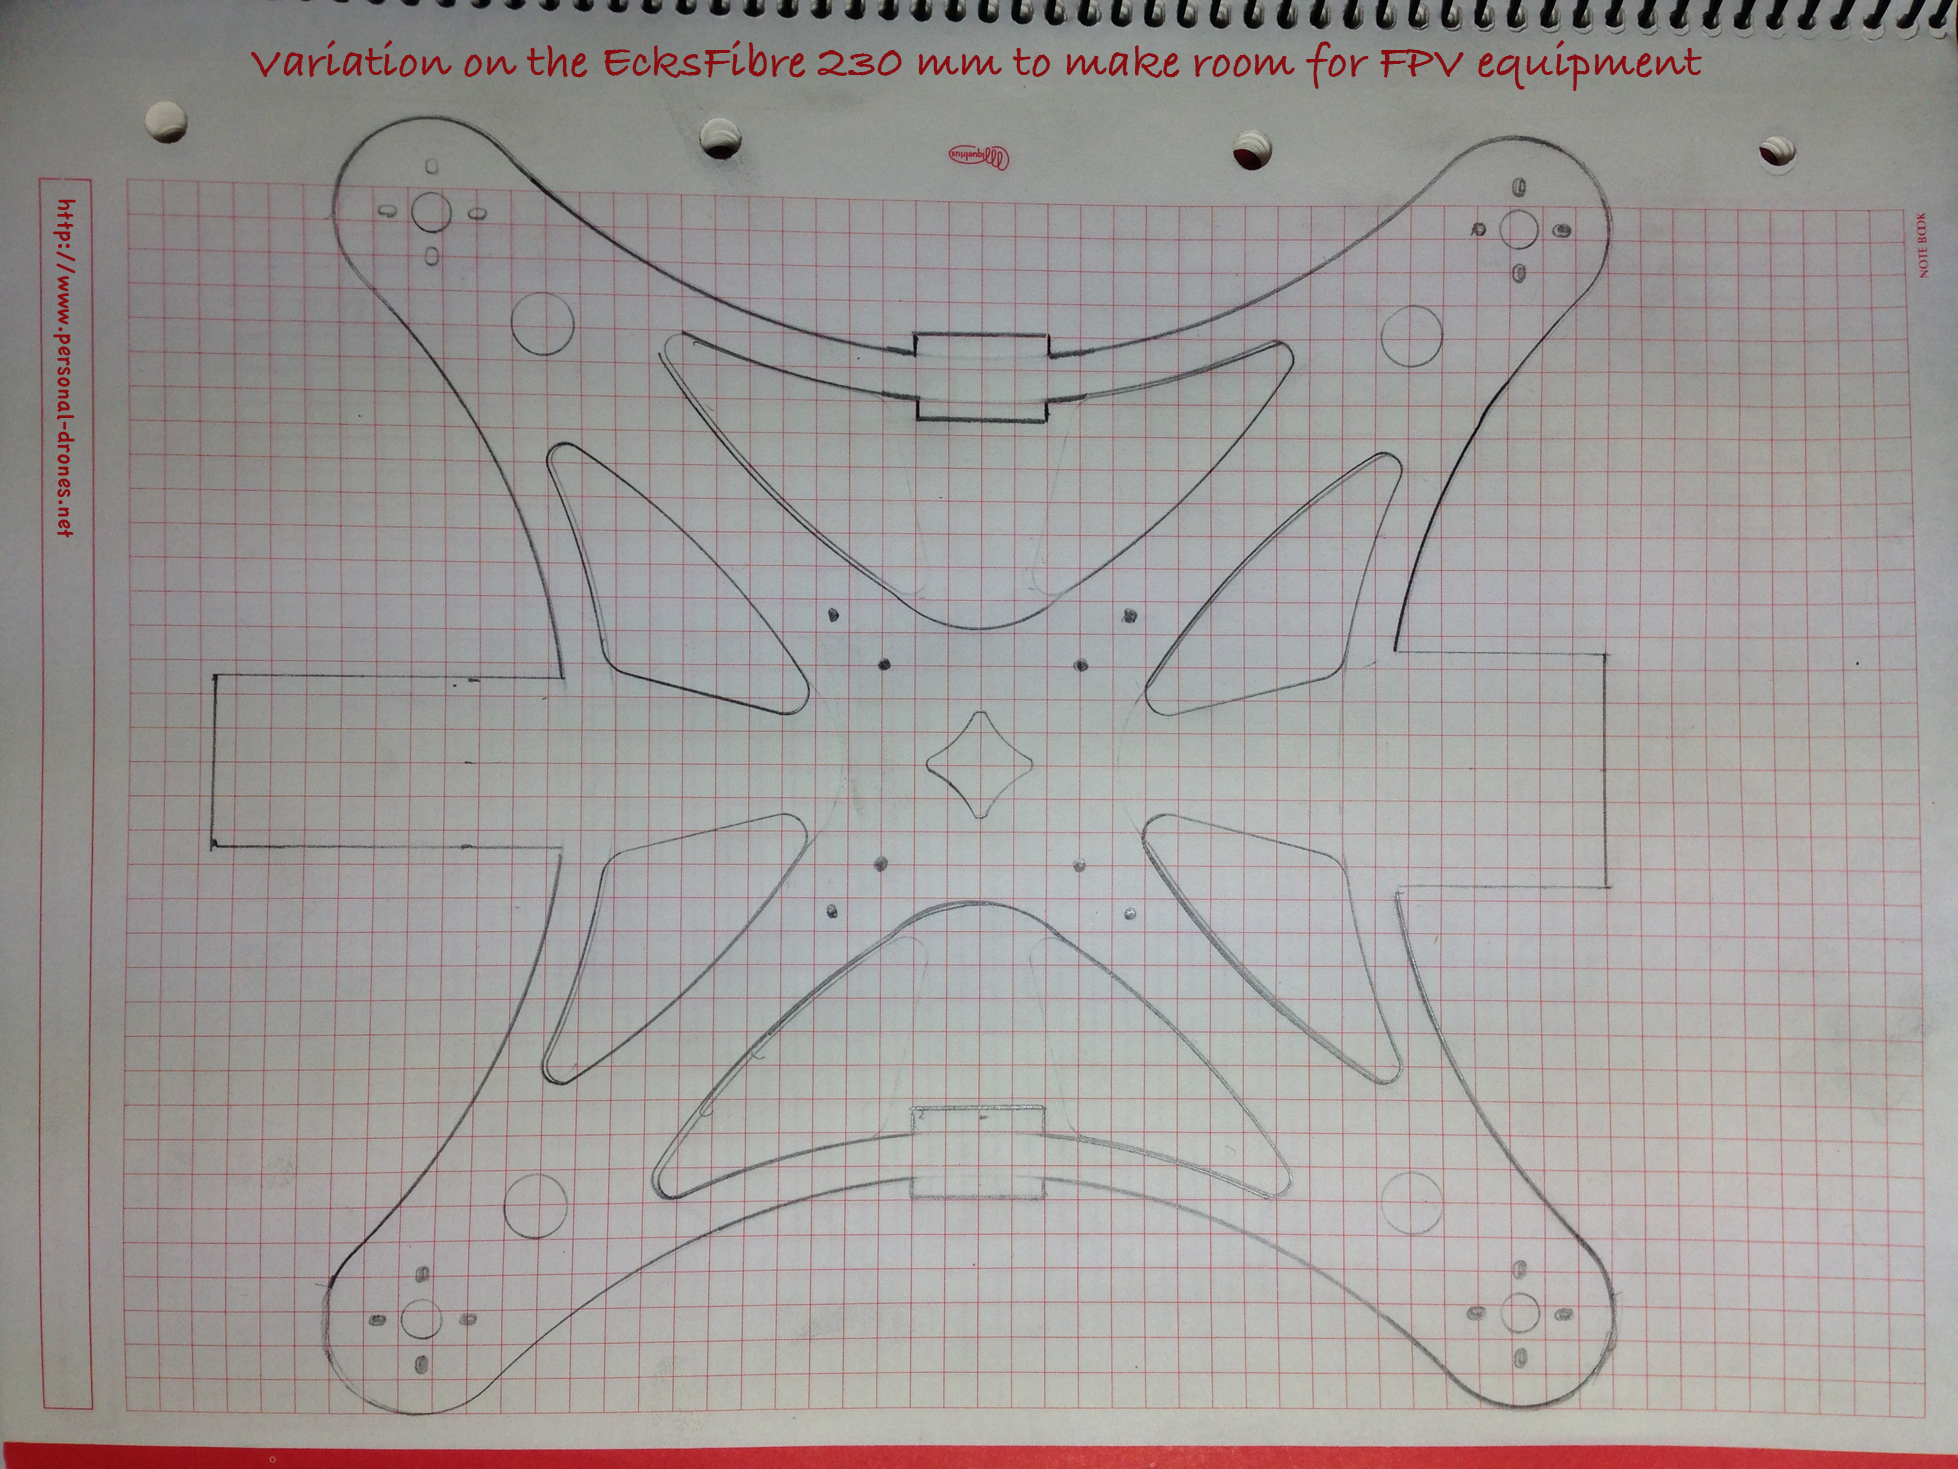
I started from an EcksFibre 230mm frame as a template. The main goal is to modify the design so as to include extension plates for a mobius camera and an immersion RC 600mW video transmitter, for First Person View flight.
The EcksFibre 230mm frameThe plan: adding extensions for a Mobius camera and an Immersion video transmitter
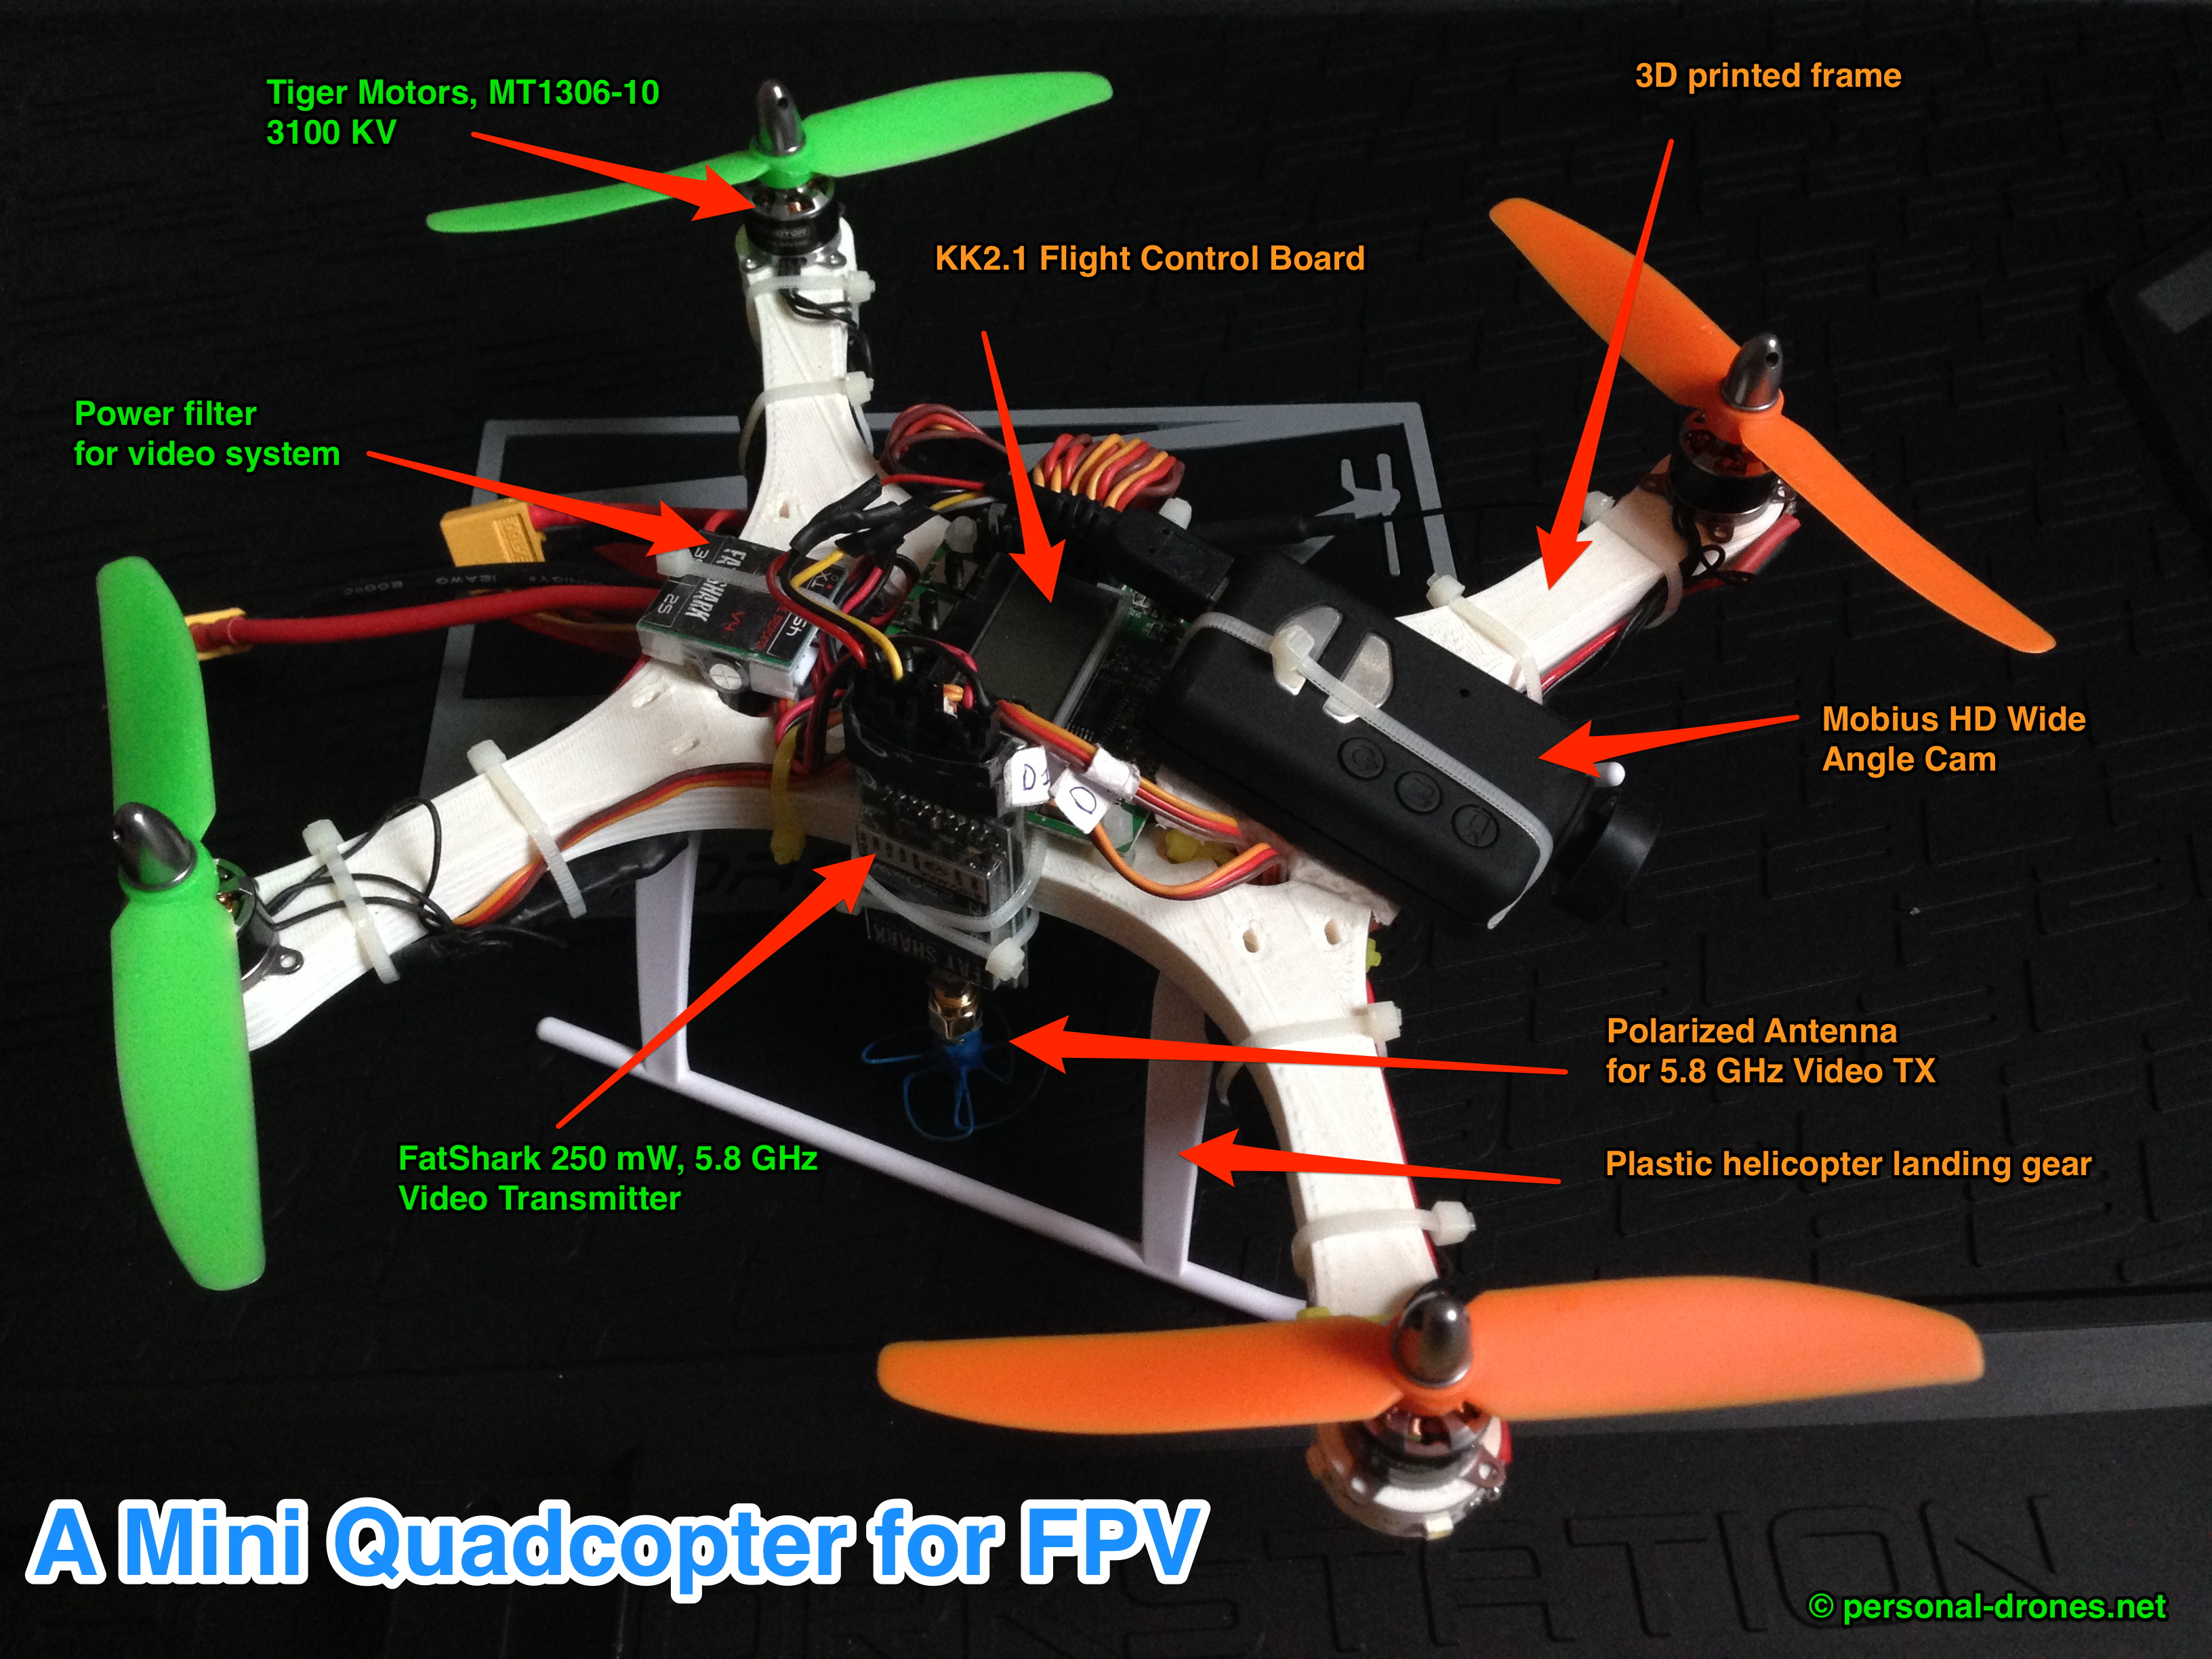
I’d like to report here some details of my last personal drone build, a mini quadcopter for First Person View (FPV) flight.
A manually assembled mini quadcopter for FPV
Weight: 360 gr w/o battery. With 2200 mA 2S battery: 487 gr.
Size: The 4 motor centers form a square with a side of 17,5 cm and a diagonal distance from front motor to back motor of 25 cm. So the quad is in the 250 class. Continue reading Building a mini quadcopter for FPV→
As it happens, care to details and sometimes the use of some dedicated, although simple and inexpensive devices can go a long way in protecting your expensive equipment. One piece of delicate equipment used in RC models, and in particular for FPV, are indeed video cameras, with their exposed lens.
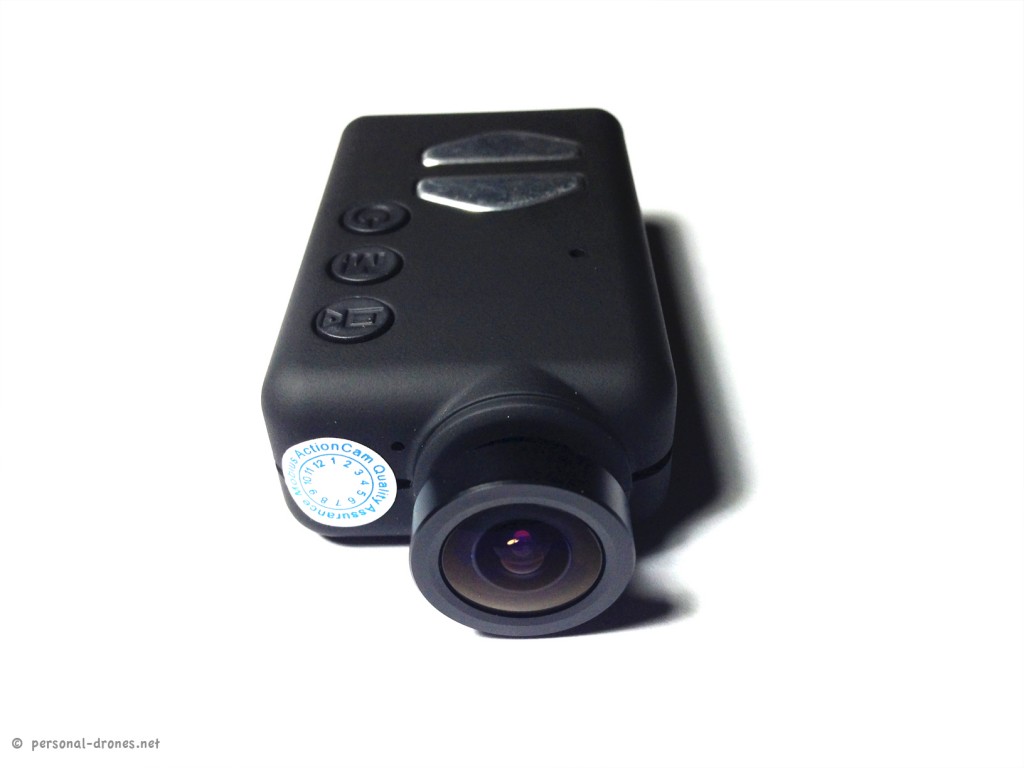
We have been discussing the setup of the Mobius camera for FPV in a previous post. Since then, a nice new model with wide angle lens came out:
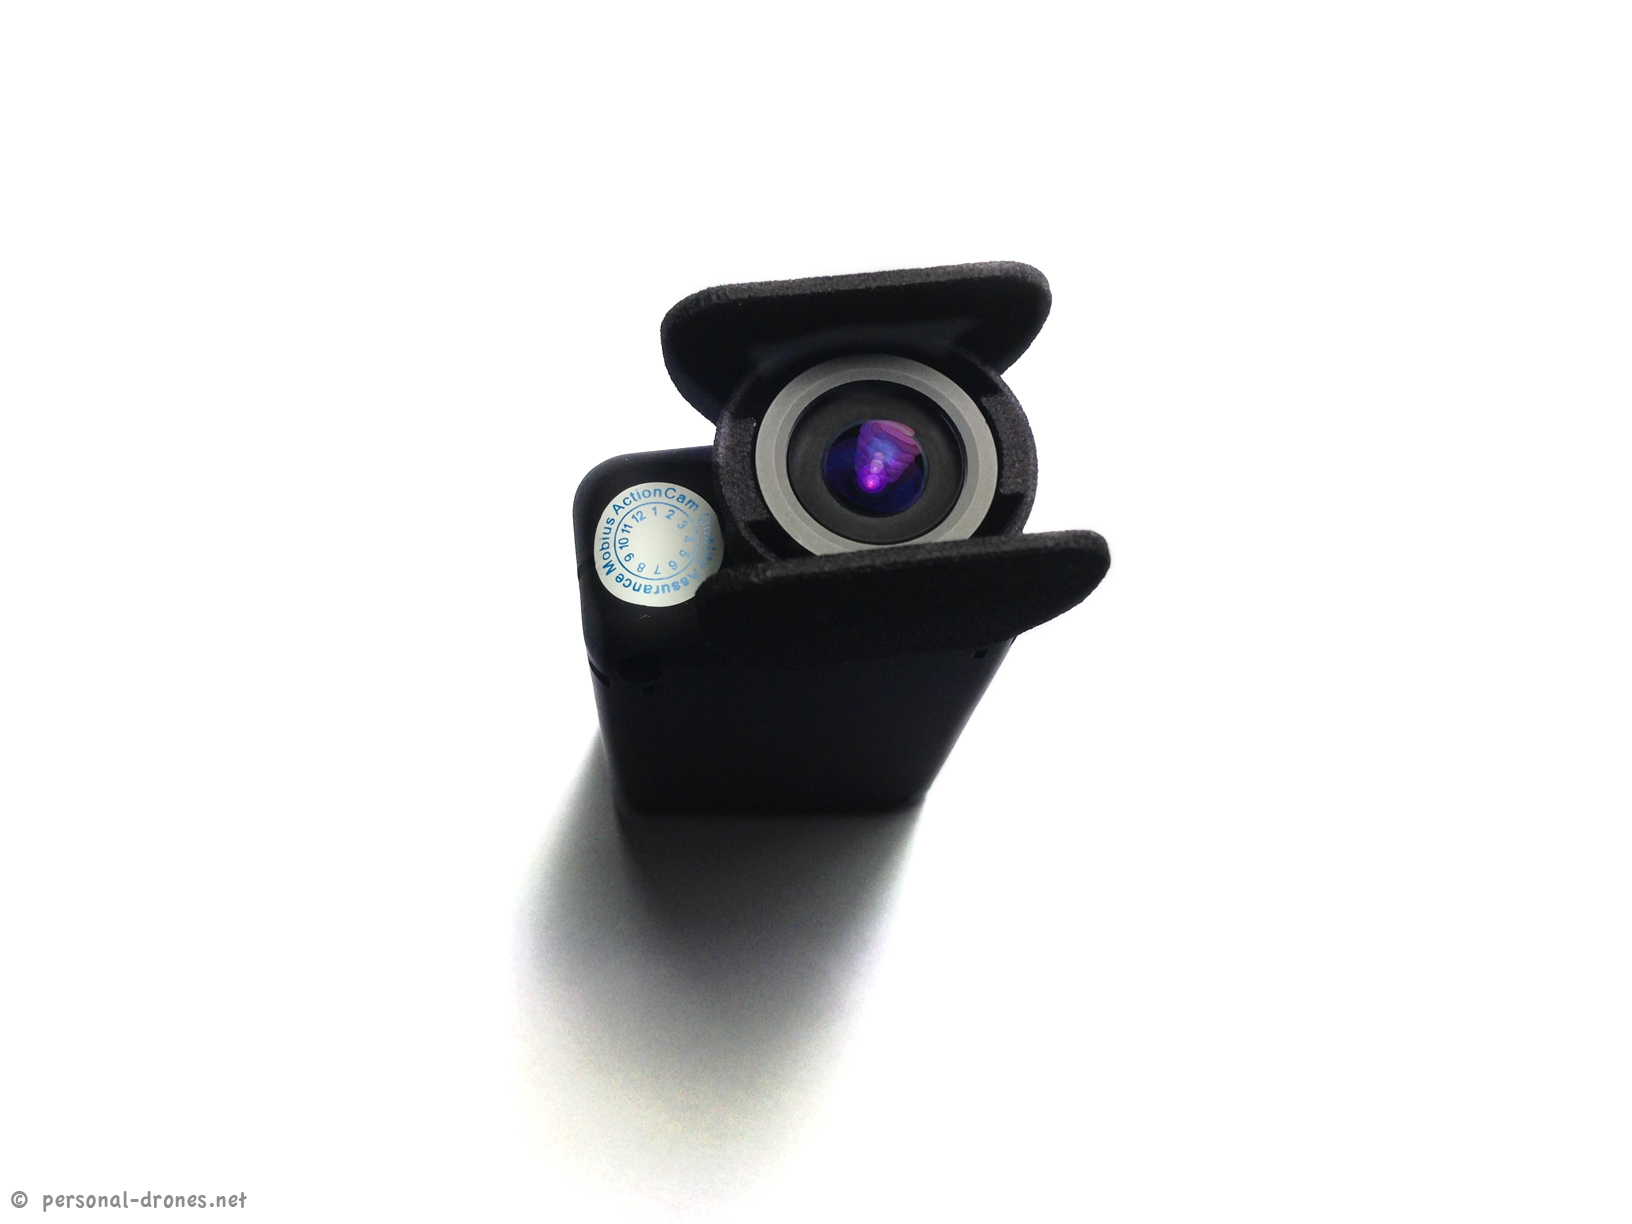
Mobius camera, wide angle version
This is even better than the original version as for FPV it is great to have an as wide field of view as possible.
The wide angle lens is however somewhat bulky and protrudes prominently from the camera body. In the event of a collision, the lens will make for a great shock absorber for your multirotor, especially if the camera if mounted on the front of the aircraft, as it usually happens. But of course you see the point here: chances of damaging the precious optical element are significant.
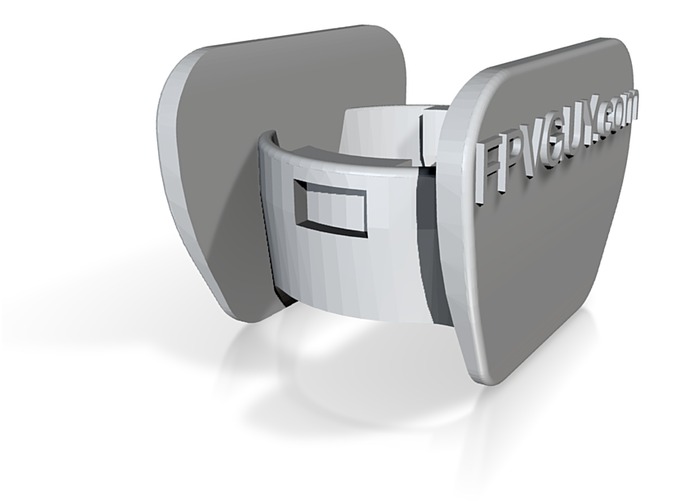
There comes to the rescue a great, lightweight, little custom piece of equipment designed by Bo Lorenzen (check out his Blog at FPVGuy.com) as a shock absorber / lens saver to protect the lens of the wide angle Mobius camera.
I tried it and it is a perfect fit. Once in place the piece will grip strongly to the camera. A little pressure on the two little “wings” will release grip and allow a smooth removal.
Wide angle mobius camera with lens protector from FPVGuy – Top viewWide angle Mobius camera with lens protector from FPVGuy – Front view
The mobius wide angle lens protector is described here and can be ordered from Shapeways. It is made with a 3D printer from the original Bo Lorenzen design.
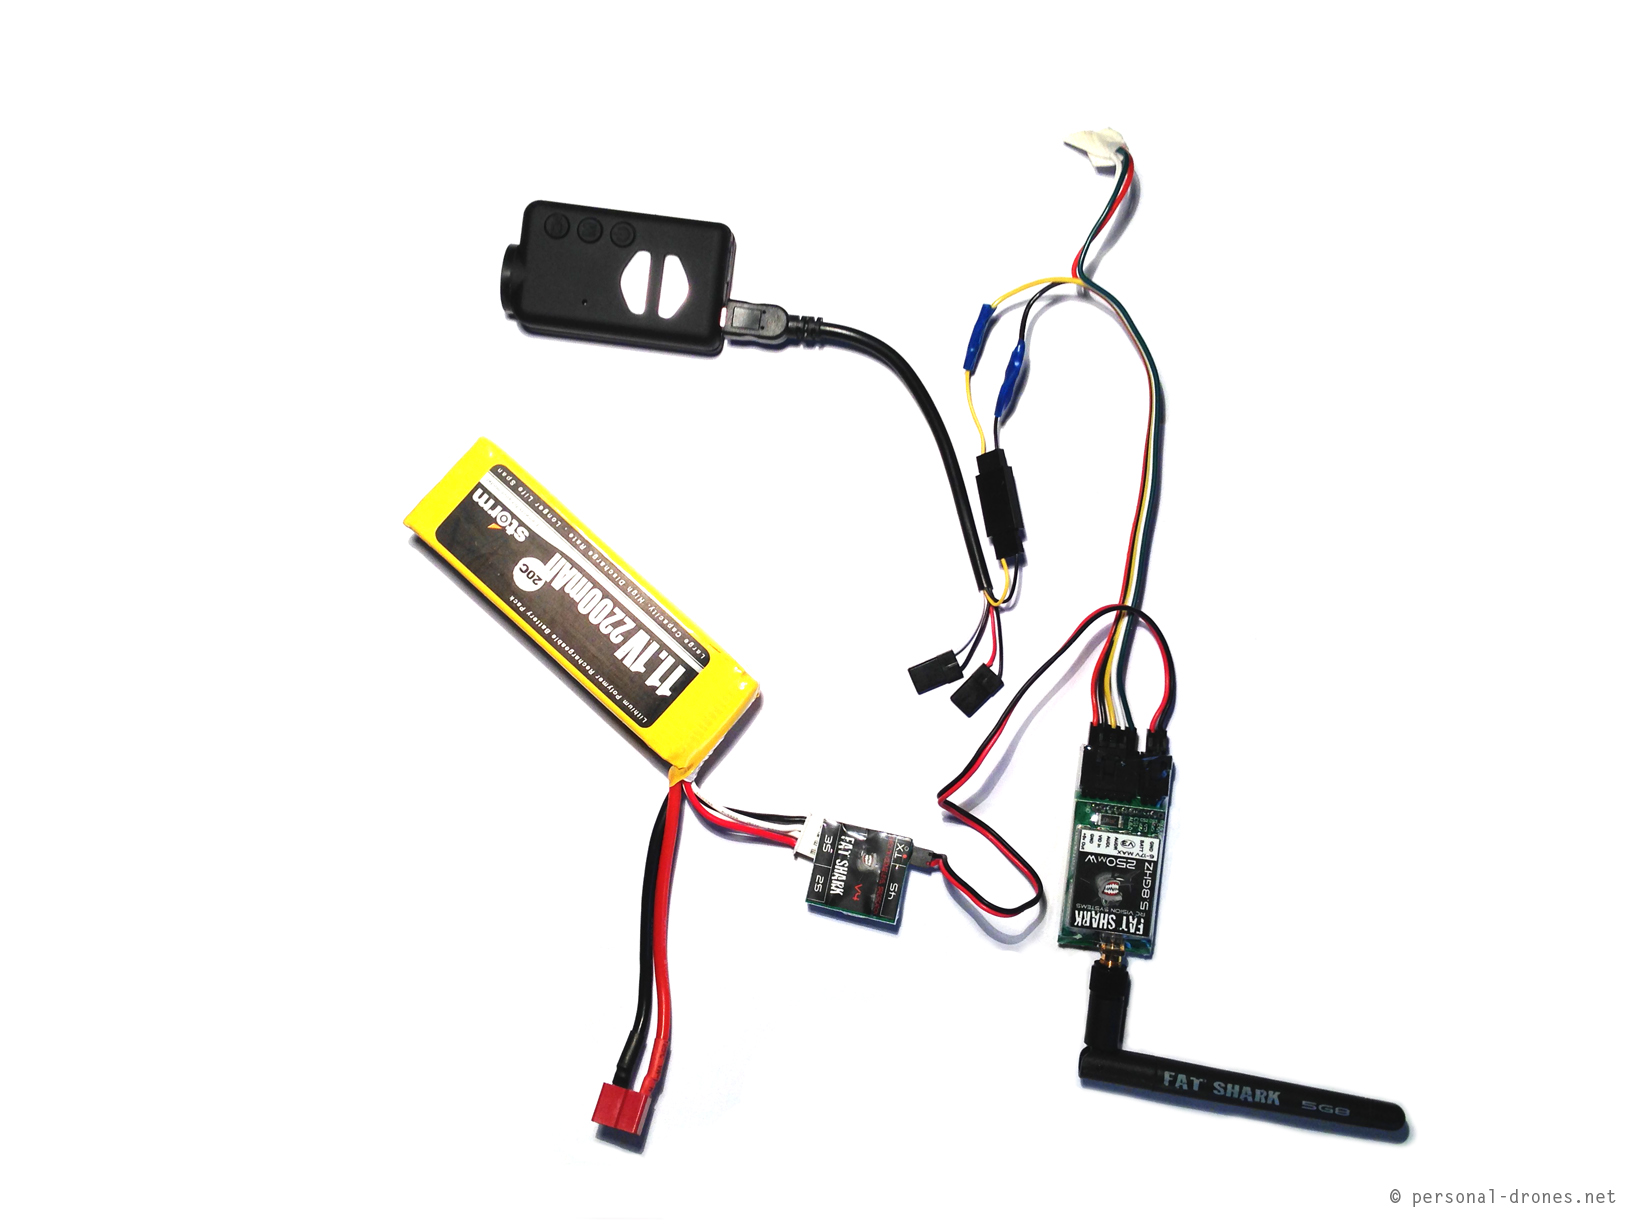
The Mobius camera is the big brother of the 808 camera. It features 1080HD quality, a wide angle lens, easy of use, light weight, storage on SD card. I recently got one and decided to try an FPV setup by using this camera together with a Fat Shark Immersion 250mW 5.8GHz video transmitter.
Since it took me a little while to figure out how to establish a correct cable connection between the camera and the transmitter, I thought I would share here how I did it, it’s an easy and quick FPV setup.
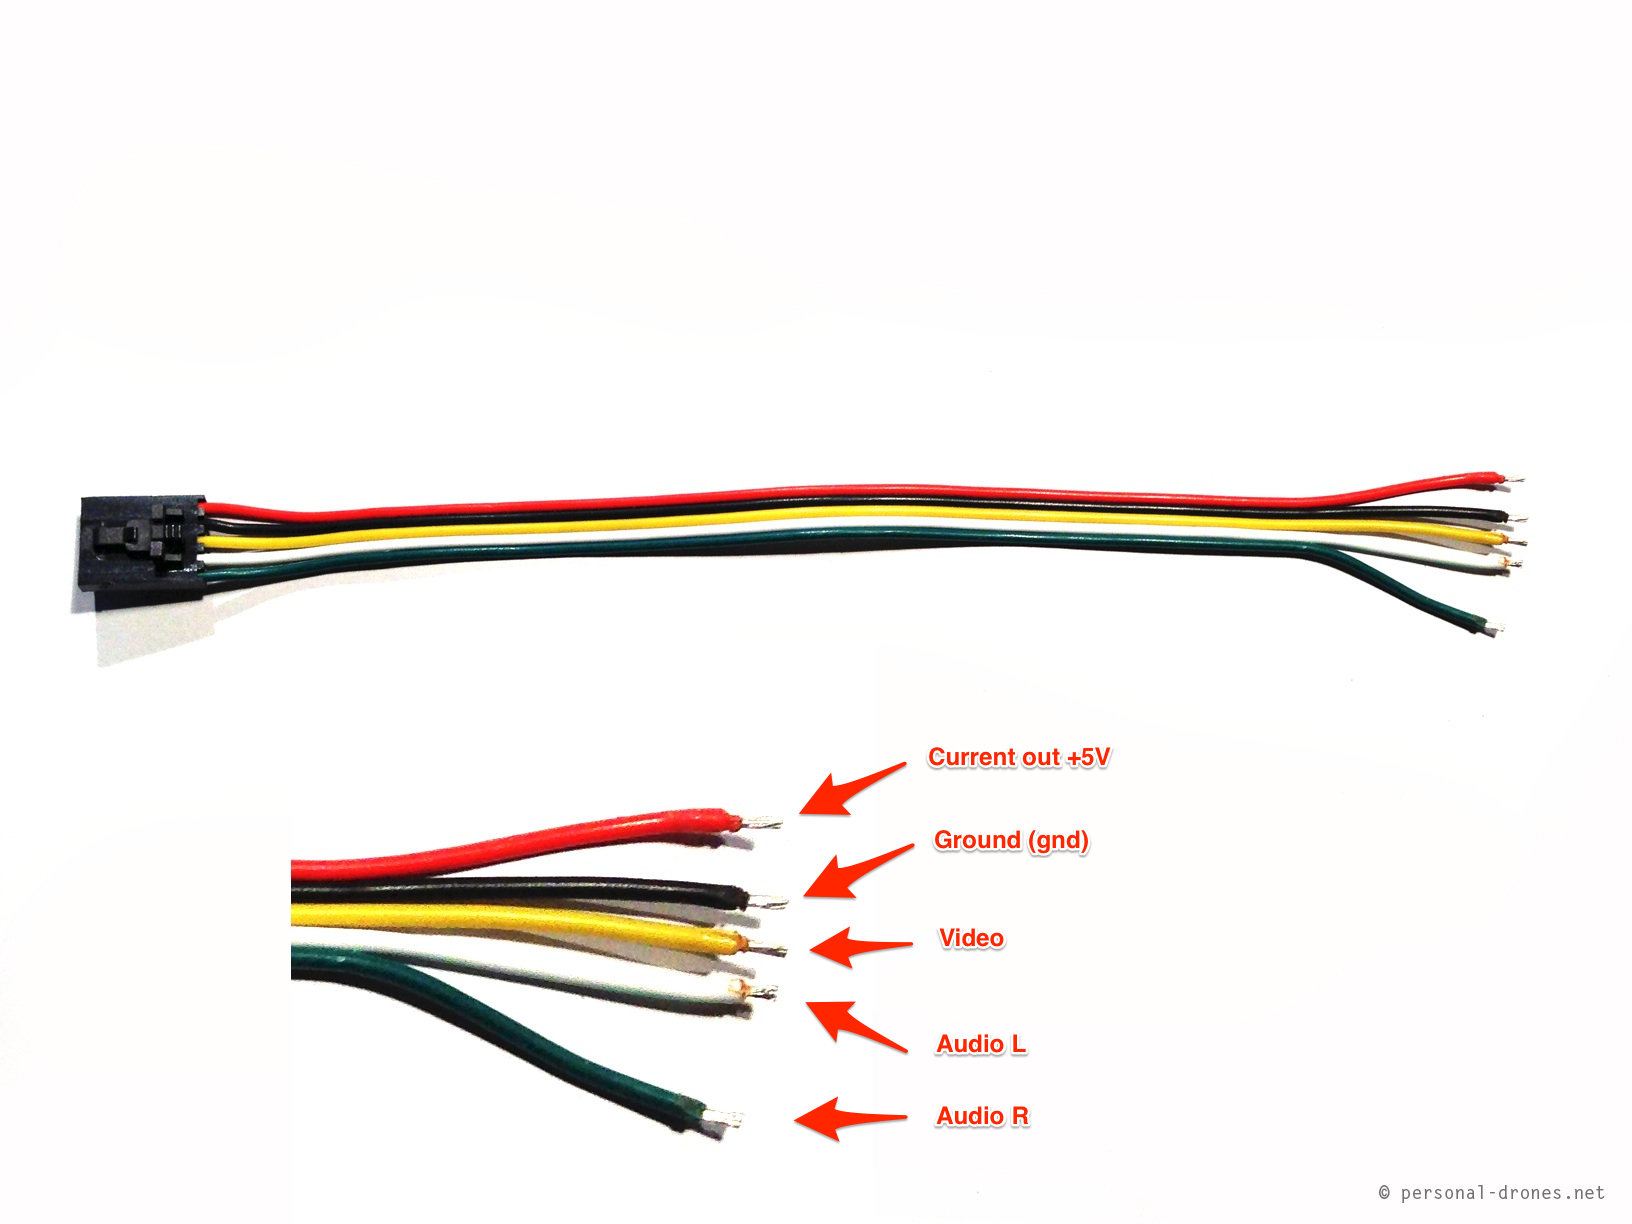
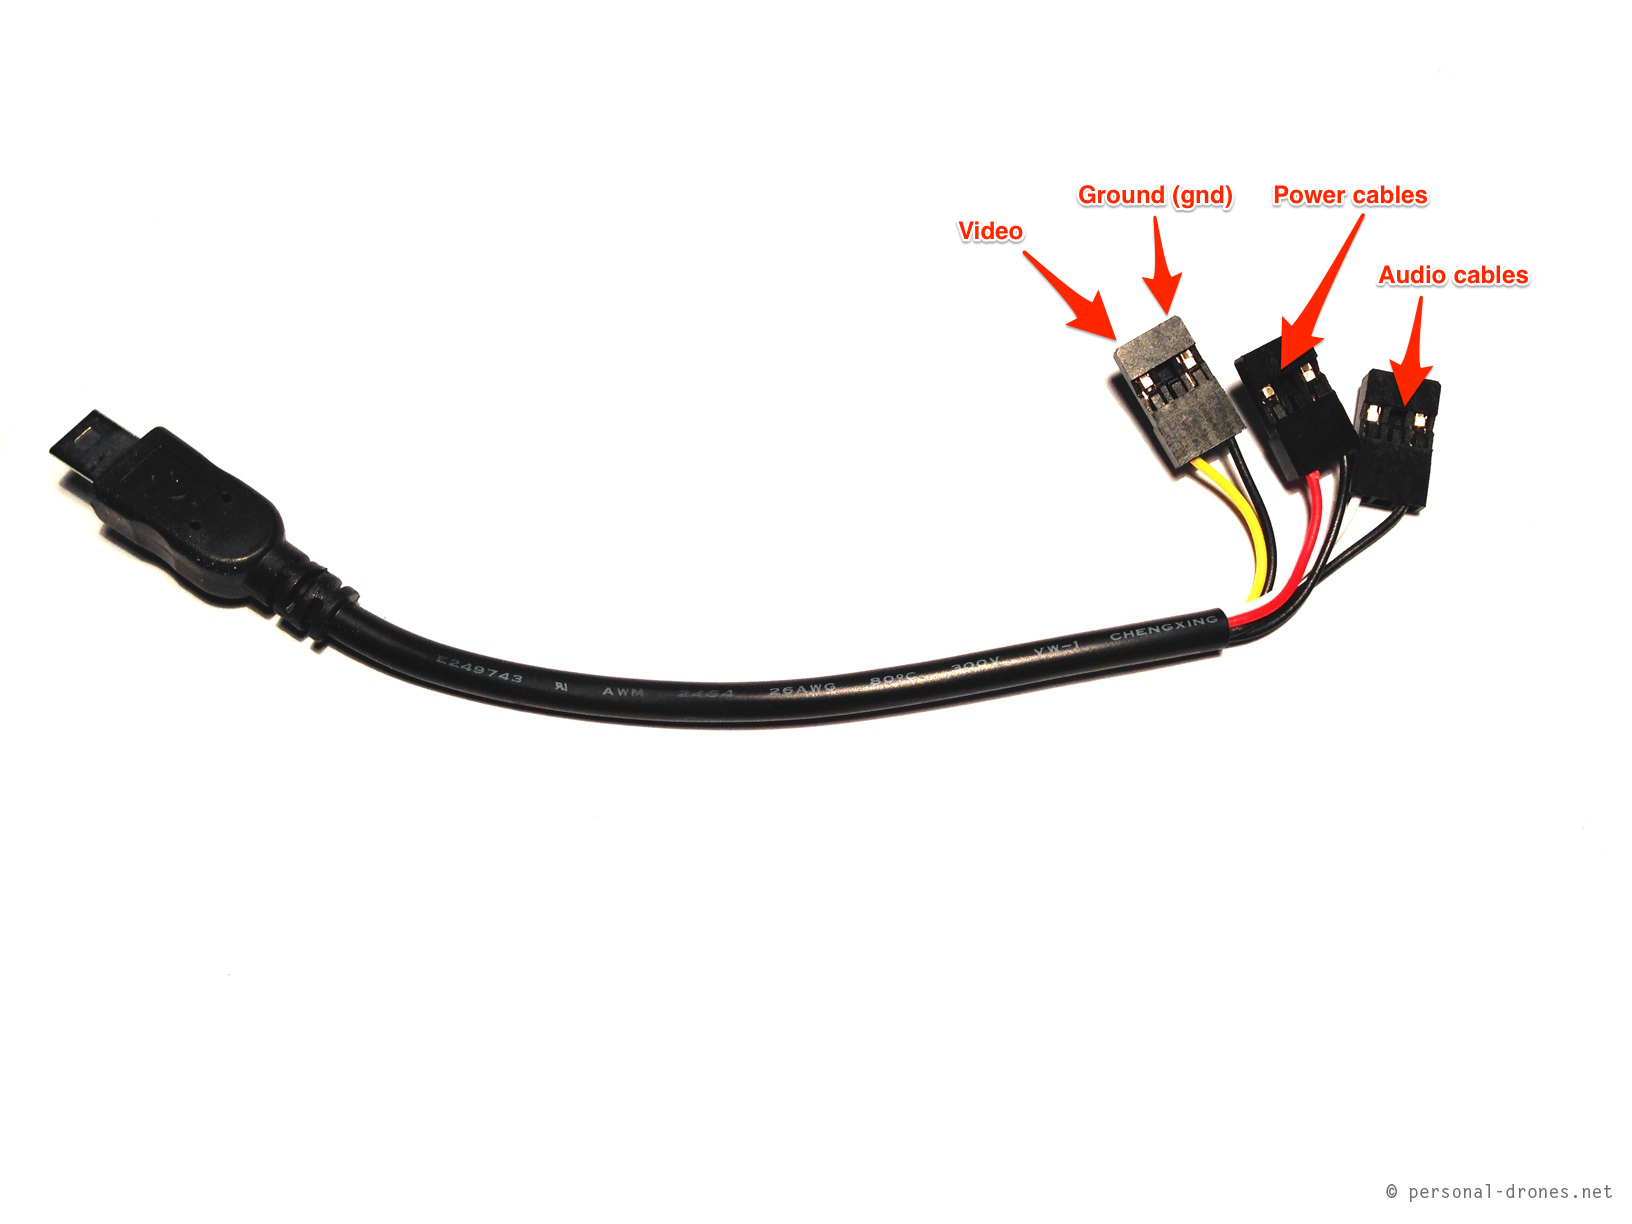
First let’s have a look at the immersion style cable that comes with the transmitter:
Immersion style video transmitter cable
In this little tutorial we will limit ourselves to connect the video component only, constituted by two wires: the video wire (yellow) and the ground (gnd) wire (black). However, by following a similar approach, it is easy to also hook up the audio and power wires, so as to provide power to the camera directly from the battery of the aircraft.
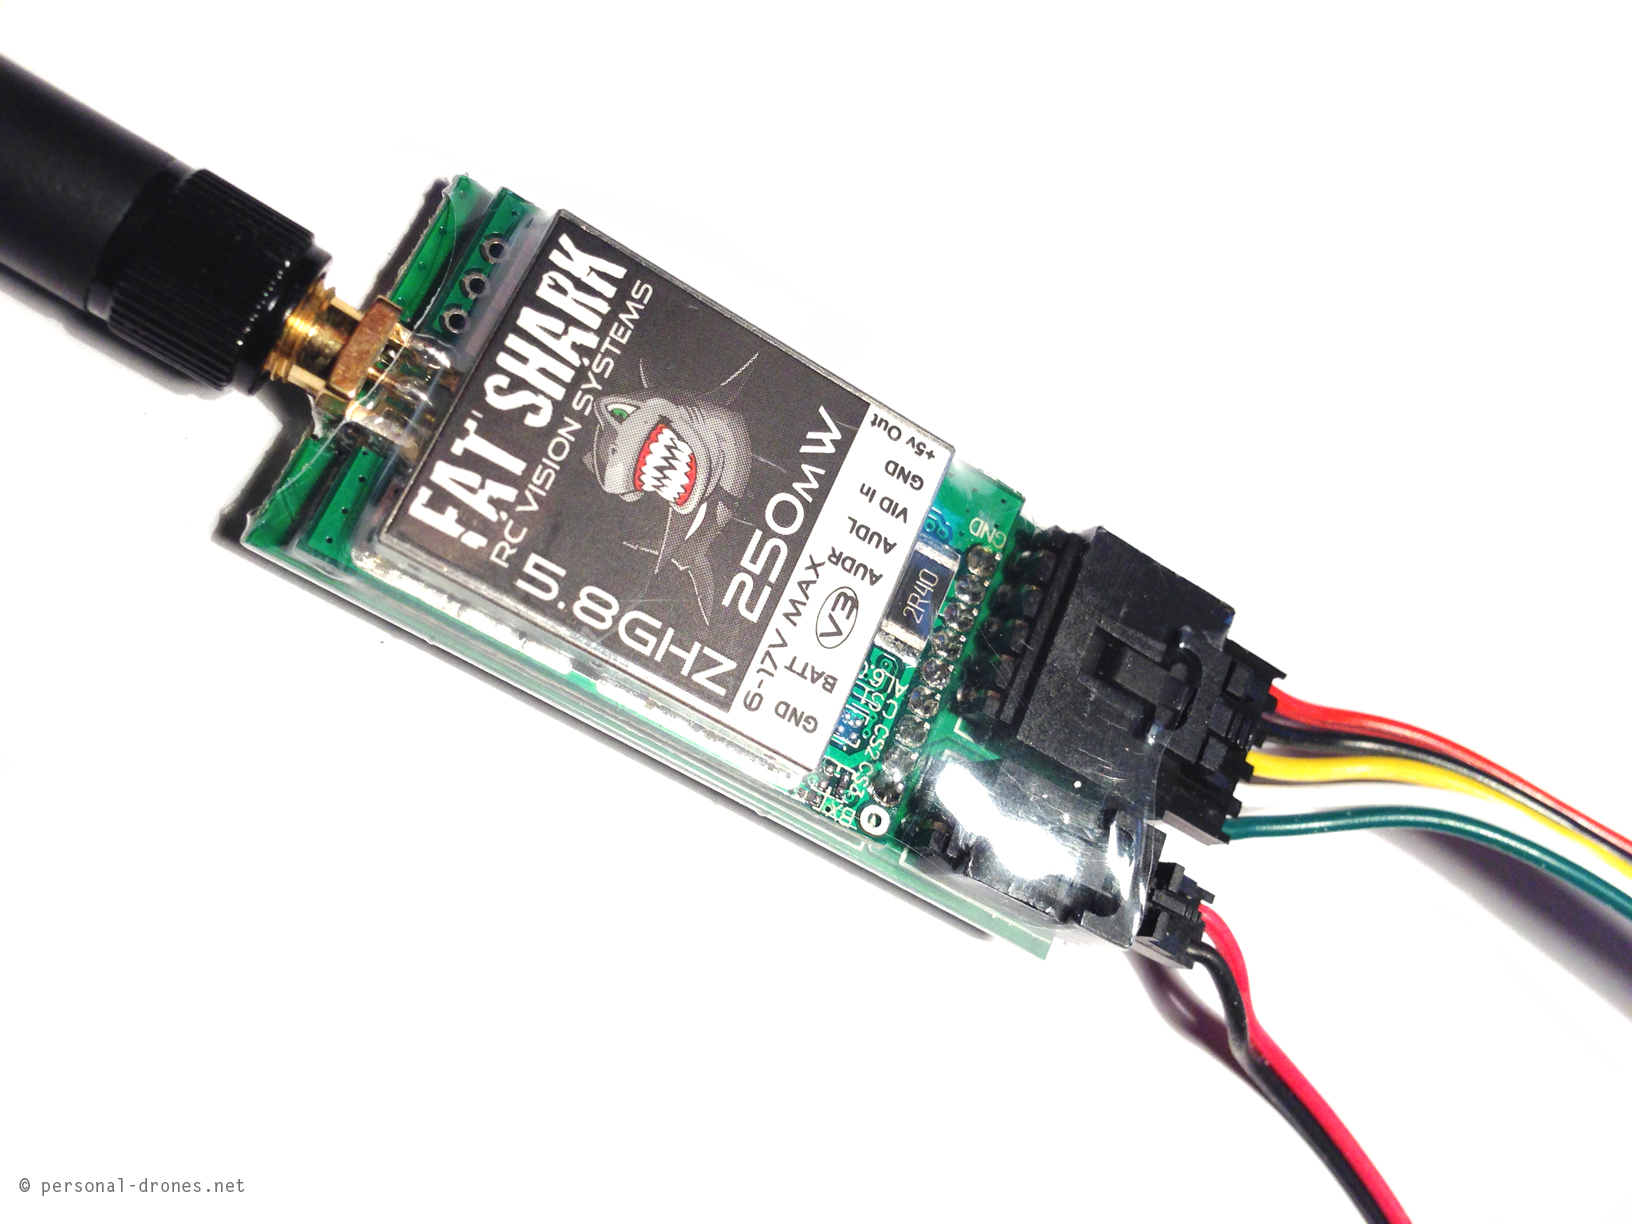
This is the transmitter cable connected to the Fat Shark video transmitter:
FatShark 250mW, 5.8GHz video transmitter
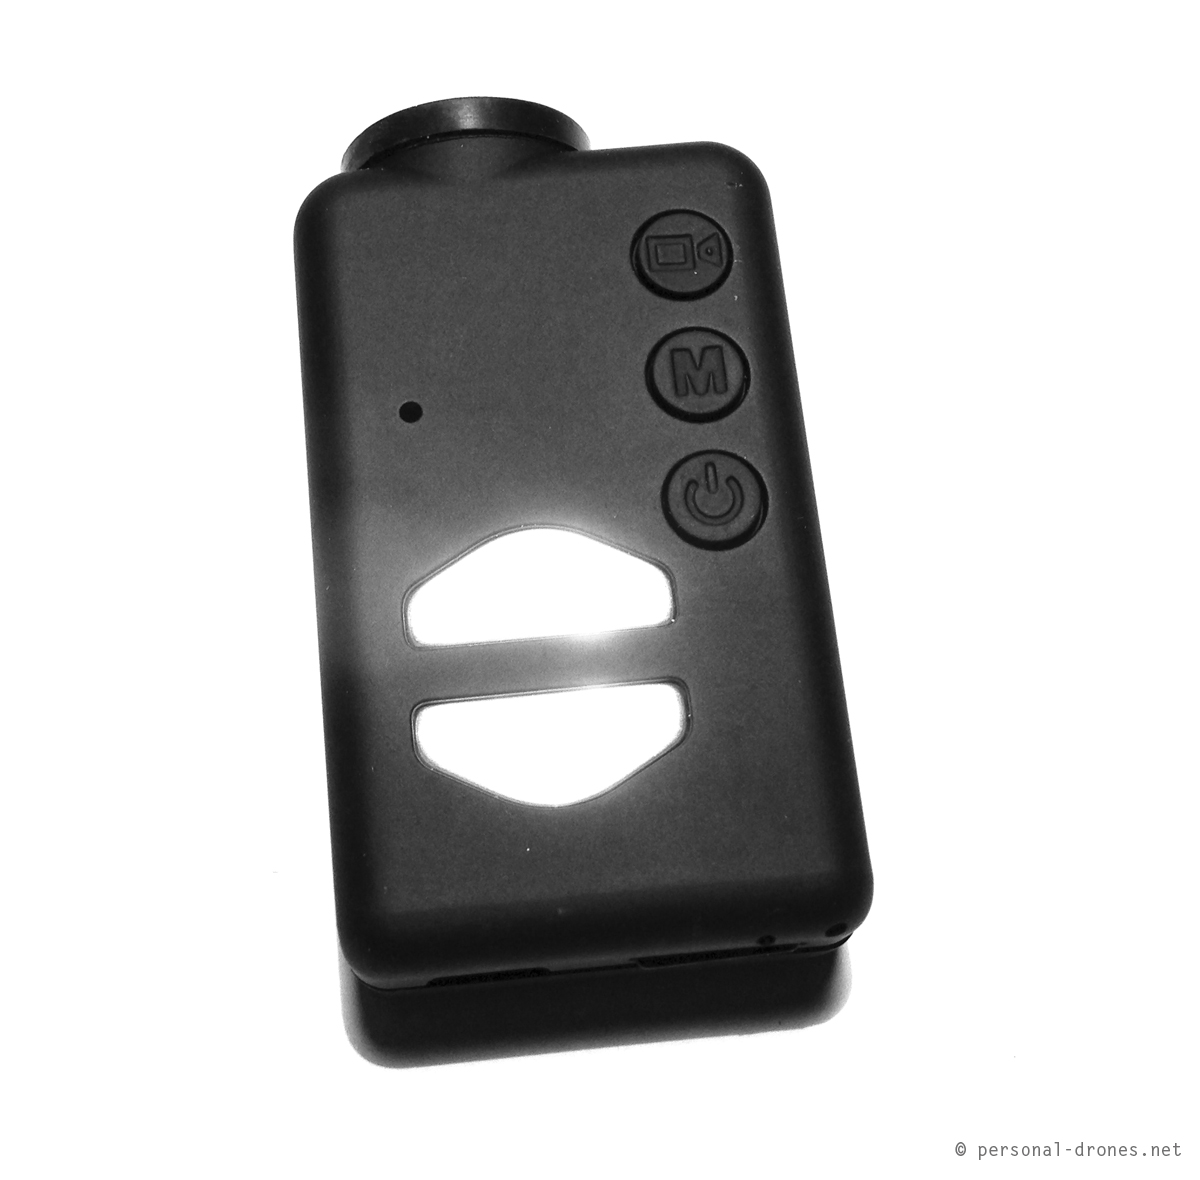
For the mobius camera
Mobius camera
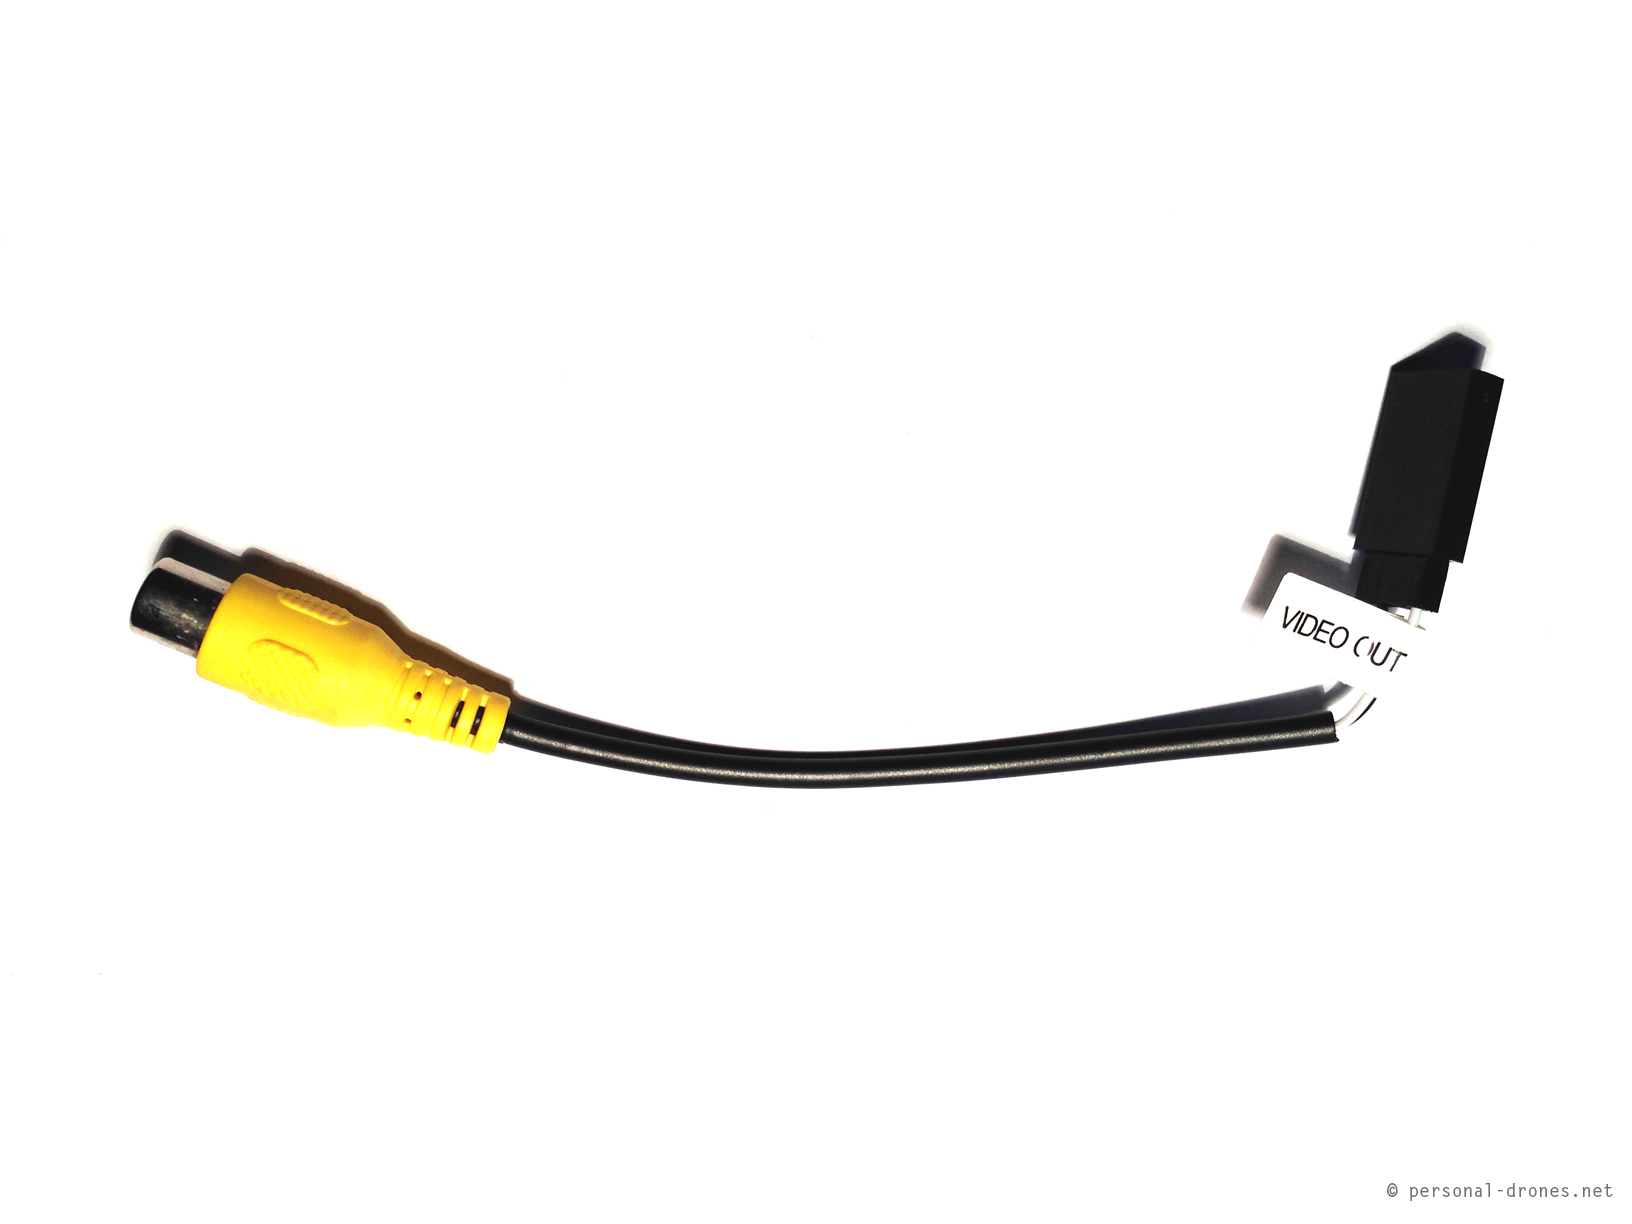
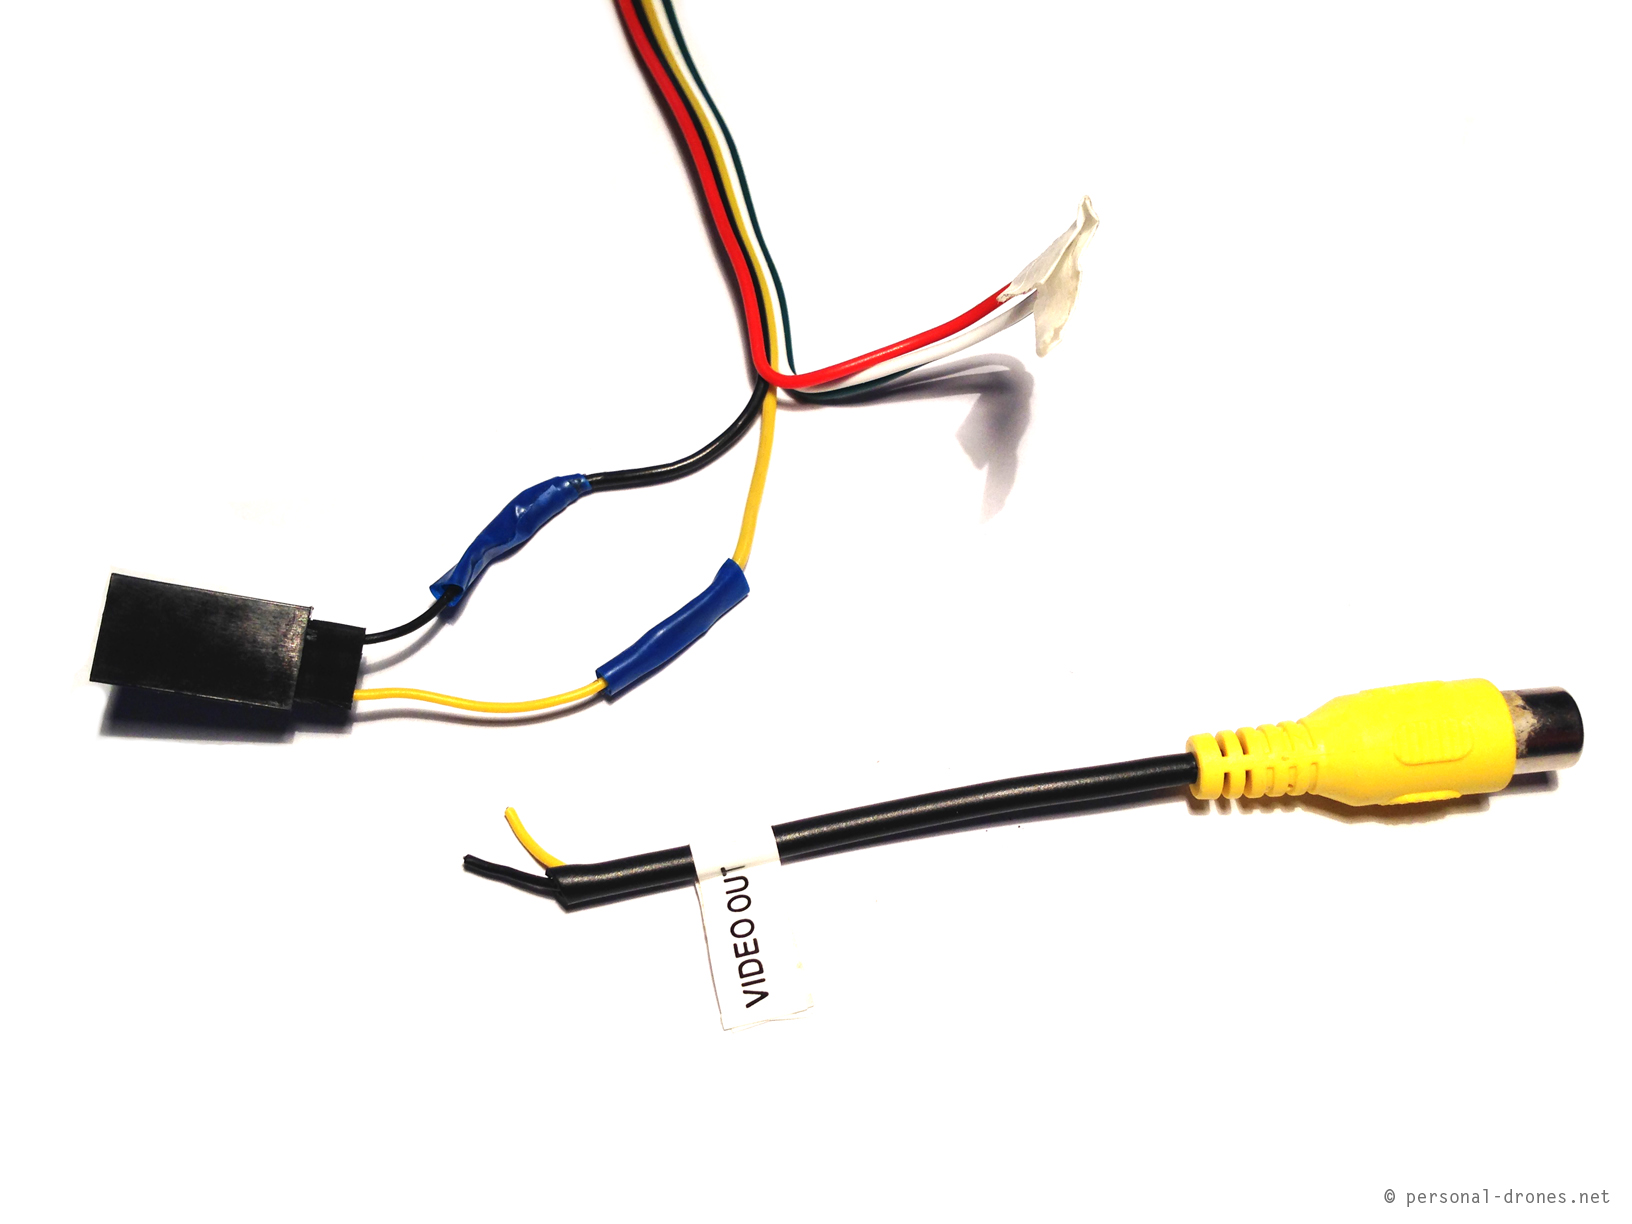
it is easy to buy a special usb cable for video and audio out and power in. It looks like this:
Video out usb cable for mobius camera
What we want to do is connect the video and ground wires of the USB connector to the video and ground wires of the transmitter cable. We could simply cut out the connector for the video and ground wires from the usb cable and solder them directly to the corresponding wires of the video transmitter cable. However I opted for a little more flexible setup that would leave the usb cable intact, for an eventual different use in the future.
The mobius cables set (optional purchase) not only includes the usb video out cable (photo above) but also an RCA video cable that can be connected to the video connector of the usb cable. It looks like this:
Video cable for mobius camera
In the cable in the photo above the video wire is white. I actually used a very similar cable in which the wire is yellow instead.
What we will do is to cut out the connector from the video cable and solder it to the corresponding cables on the video transmitter cable. Here’s the final result:
Job finished. All you have to do now is connect the camera to the usb cable, then the video connector of the usb cable to the newly attached connector to the video transmitter cable.
This is the final complete FPV setup:
Mobius camera connected to the FatShark 250mW video transmitter, complete setup
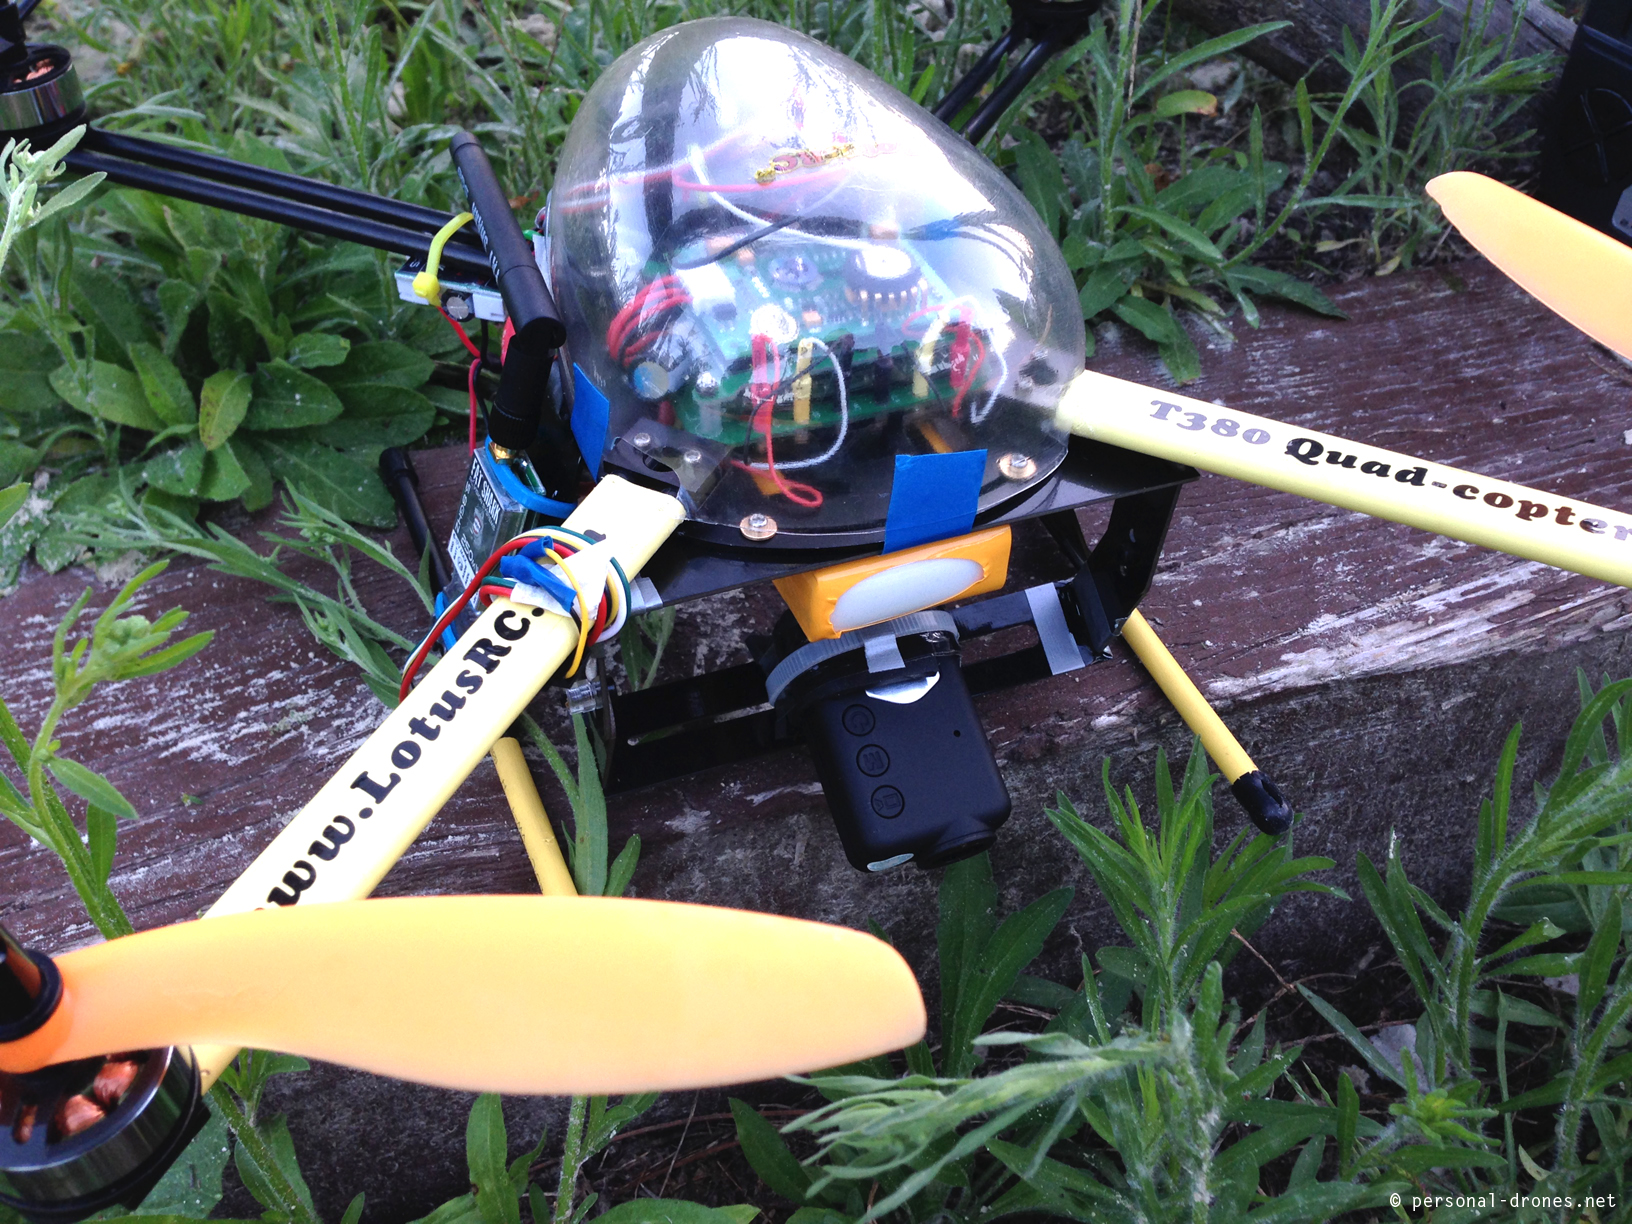
This is a first test mount of this setup on a Lotus RC T380 quadcopter.
Loutus RC T380 equipped for FPV with Fat Shark transmitter 250M and Mobius camera
Questions or comments most welcome.
Edit April 25, 2014
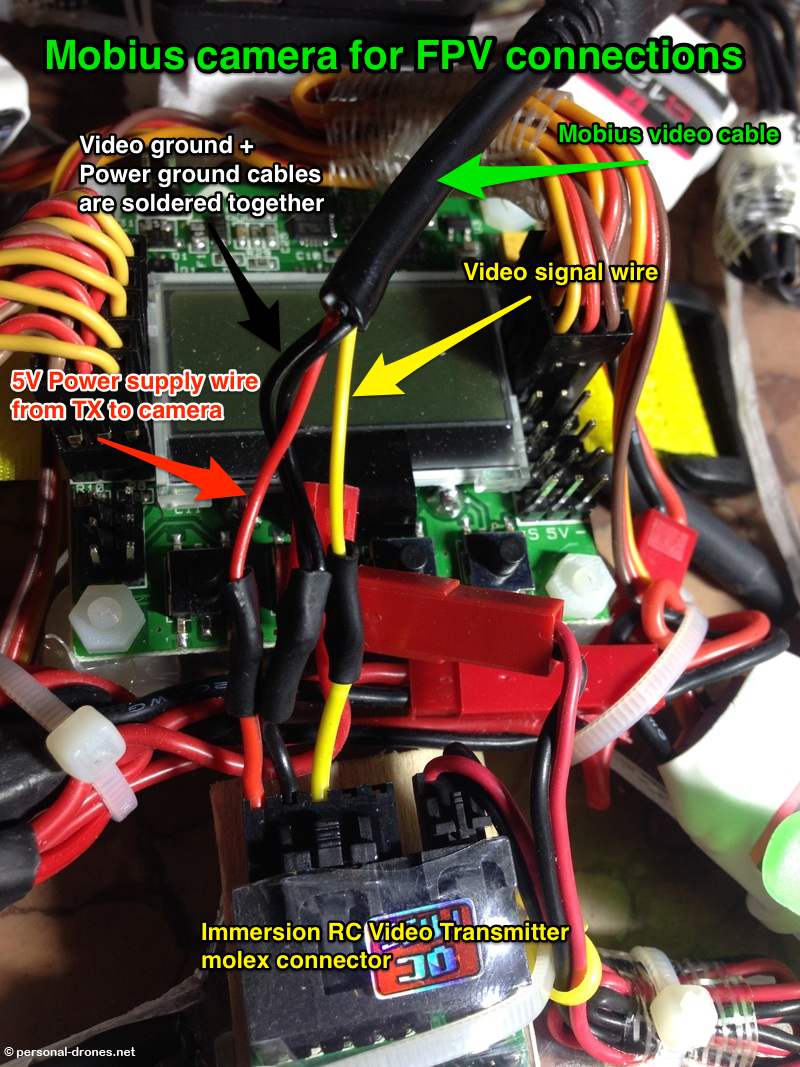
Here’s a picture in which the power wires were connected along the video signal wires. In this case the wires from the mobius video cable were soldered directly to the wires of the molex, with no connectors in between:
Another example of setup for the mobius camera for FPV in which the wires were soldered directly and the power wires were connected in addition to the video wires
A quest toward the perfect quadcopter or multirotor for aerial video and personal flying freedom and a permanent survey on the latest quadcopter news and multirotor news
This website uses cookies to improve your experience. We'll assume you're ok with this, but you can opt-out if you wish.AcceptPrivacy and Cookies Policy
Privacy & Cookies Policy
Privacy Overview
This website uses cookies to improve your experience while you navigate through the website. Out of these, the cookies that are categorized as necessary are stored on your browser as they are essential for the working of basic functionalities of the website. We also use third-party cookies that help us analyze and understand how you use this website. These cookies will be stored in your browser only with your consent. You also have the option to opt-out of these cookies. But opting out of some of these cookies may affect your browsing experience.
Necessary cookies are absolutely essential for the website to function properly. This category only includes cookies that ensures basic functionalities and security features of the website. These cookies do not store any personal information.
Any cookies that may not be particularly necessary for the website to function and is used specifically to collect user personal data via analytics, ads, other embedded contents are termed as non-necessary cookies. It is mandatory to procure user consent prior to running these cookies on your website.